Hello! I am Laura Quesada Allue. I was born in January 2010. Maybe you were wondering why my daddy hasn’t written anything on this blog for the last 8 months? Well, now you know!
This blog post tells the story of how my parents used Visual Management to coordinate the tough project of preparing themselves for my coming to the world. I leave you with them now…
Project initiation
When we learned we were going to be parents, the first thing we did was to think about the main characteristics and constraints of this project.
- There were two main tracks. One had to do with making sure the pregnancy and delivery went well. Tasks in this track were for example periodic visits to the doctor, finding a good hospital, etc. This track was high priority and almost all tasks were “must have”.
- The other track dealt mostly with things we needed to get ready before the baby was born, such as the baby room, the baby card, having enough clothes, the Maxi-Cosi, etc. Tasks in this track were spread all over from “must have” to “nice to have” so they were very good candidates for prioritization.
- We can think of the customer of the project as Laura, and the team as us the parents. Other stakeholders included the doctors, family and friends.
- This project was going live no matter what. Like the Olympics, you can’t change the date one month before launch just because you’re not making it! An interesting note is that we didn’t know the exact go live date, we only had a range. We would be told the exact launch date by the customer (Laura) with aprox. 24hs of anticipation :). So we had to be ready with all must-have functionality by the earliest possible launch date.
- For some tasks the acceptance criteria was very negotiable. For example: buying a crib was a must-have. But that the crib should be the coolest crib on earth was nice-to-have. ‘Coolest on earth’ was part of the negotiable acceptance criteria of that story.
- Some tasks had to happen at a certain fixed date, others were flexible. Typical fixed-date tasks were doctor’s appointments for example.
- The team members (us, the parents) were not working full time on the project. This means that at certain moments, if necessary, we could scale up our efforts on this project to the detriment of other parallel projects we were doing (for example searching for a house, or our day jobs).
- We wanted to delay doing things until the last responsible moment, but we also wanted to do things at a sustainable pace. The challenge was to balance our workload evenly.
Based on these characteristics, we chose the following Visual Management strategy:
- Since the project was time driven, we would build a physical taskboard that visually represented the project timeline.
- We would populate the board with tasks and metadata (important information we had about the project).
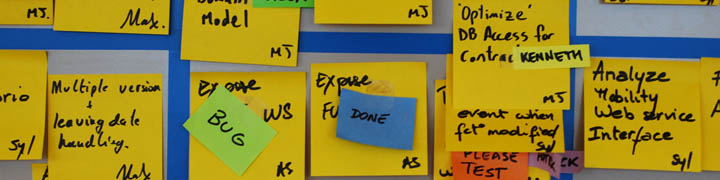
- Tasks would have a different color based on their nature: orange for normal tasks, pink for fixed-date tasks (appointments), blue for special events such as Agile conferences or other travel.
- The pink and blue tasks were fixed on the timeline by their nature. The orange tasks could be moved around. We would balance the load by changing the position of orange tasks so as to spread work evenly throughout the project.
- What to do with tasks that got done? First we thought on crossing them out and keeping them there, but we quickly learned that it was visually confusing. So finished tasks would be removed from the board.
Building the taskboard
Note: you can click on all the pictures for a high-resolution version.
The timeline represents the 9 months of pregnancy (blue lines) and the first 3 months of Laura’s life (green line). We didn’t know if we would need the green line, but we had space left over so we put it in anyways.
We wanted to visualize calendar months and pregnancy weeks at the same time, because certain tasks or events are commonly associated with the week number, while months gave us the big picture.
A detail of months and weeks. What you see in blue is all electrical tape.
We got these cute clip magnets at XP Days Benelux; they would come in handy.
Running the project
This is how the board looked when we got started, in week 5 (June 2009). The board was populated with all tasks and information we had at the moment: our initial planning. We adorned the board with some cute baby-themed magnets we got from cousin Flo. Tufte would not like them, they were pure decoration.
Once the project got underway, the following activities were typical:
- We would remove post-its (tasks) as they got done.
- We would add new tasks as new requirements came up.
- Sometimes big tasks got broken up into smaller ones, or one task being completed triggered more to be created down the line.
- We would re-prioritize tasks if they were not done by the original planned date.
- Reports generated by the project, for example the ultrasounds (ecografías), were placed on the timeline.
- Any other relevant information was either stuck on the board with magnets or written with whiteboard marker.
We would regularly make small improvements to the board. For example we added a green “you are here” arrow. Some people asked us what the board was about, so we added the title “Baby Board”.
The board was both an effective planning tool for the future, and a living recount of the past.
You can see that as the green arrow moves along, the post-its disappear with it. The fact that post-its were not accumulating further down the line meant we were proceeding at a good pace. If we would notice a cluster of orange tasks accumulating, we would know we were behind schedule and would react by putting in more time, or dropping requirements.
Finally the date was approaching! We knew the project would be a success because almost all our tasks were done.
Going live
The release to production took 11 hours, and was quite tough for one of the team members (guess which one)… but eventually it was successful and the project went -very literally- live. Welcome, Laura!
In Belgium, people exchange cards when a baby is born. As cards started to arrive, we put them on the taskboard, turning it into a “celebration” board.
At the end, we almost didn’t have enough room! One of the best cards we got was a mini-taskboard baby card from one of the teams we coached. Thanks guys!
To close, a big smile from Laurita dedicated to all the friends in the international Agile community. Isn’t she cute?


Recent Comments